The concept of perspective in art is about creating an illusion of depth and dimension while working with a flat surface. With photography that means taking a three-dimensional scene, transferring it into a two-dimensional medium all while still capturing the feeling of depth from the original scene. As I like to say, “photography is about preserving perspective”.
Understanding how a lens captures and distorts perspective is important to help make sure the end results work. Which also involves a clear understanding of the principles and tools you can use to preserve that illusion of depth in your photo.
Table of Contents
ToggleLessons in Perspective from Art
In order to better understand how to create this illusion let’s take some lessons from painting.
Painting and drawing requires the artist to start with a flat surface. Then by implementing concepts of perspective, based on an understanding of the science behind how we perceive space and depth, a good artist can create the feeling of dimension.
Tips for Creating Perspective in Art
These are some common tips for creating perspective in art. Taking a two-dimensional medium and giving it the appearance of three-dimensions.
Overlapping and Layering
Putt one object in front or behind another. Those in the front are perceived as being nearer to us.
Difference in Size or Scale
Our brains generally assume that larger objects are closer to us.
Near the Horizon or Eye Level
Imagine looking out over the ocean. As things approach the horizon line, they tend to be farther away from us.
Contrast: Light and Dark Colors
Darker colors tend to reseed in an image and lighter colors tend to come forward. Although this concept is not always true in art.
Contrast: Muted Colors vs. Vibrant Colors
An example that’s familiar in the photography world is atmospheric perspective. Imagin a landscape on a sunny day, those things that are farther away are bluer in color. In art mountains or other objects in the distance use muted colors, while the foreground subject has more vibrant color.
Linear Perspective
Linnear perspective is about using lines and vanishing points. As we look down a long straight road, the lines start to converge into the distance.
Contrasting colors
Using contrasting colors helps distinguish objects from one another, which helps our minds recognize them as different objects. This can be helpful when using layering or overlapping.
Amount of Detail
The farther away an object is the less detail we’ll be able to see. Using a shallow depth of field to blur out details is one way this can be achieved in photography.
Light and Shadow
Adding light and or shadow helps our brains comprehend depth and space. With art this can be difficult because if you put a shadow or highlight in the wrong place it may be perceived as unnatural.
Focus
Similar to the amount of detail, what subject we choose to both focus on as well as include a higher level of detail will feel closer to the observer. This can be done with placement as well as sharpness or detail.
Our brains are sophisticated enough that it processes all of these visual cues instantly and in relation to each other. Then based on our past experiences we can judge depth even if the perspective tends to “break” of “bend” one of the rules. It’s the combination of these visual aspects that make great paintings come to life.
Each one of these artistic principles of perspective can be applied to the photos we take. Although since we aren’t creating the perspective, but rather just capturing it, we need to train our eyes to see when we can apply these concepts.
Example of Perspective in Art
The above painting by Thomas Cole (1801 – 1848) provides a great example of several of the perspective concepts we discussed above.
Use of Overlapping and Layering
There is foreground scenery as well as some hills and cliffs that overlap the larger mountain in the background.
Using Scale
There is a shed or small cabin on the right side of the road that is most likely smaller than the larger two-story house on the left. But since it’s meant to be closer to us, its relative size is similar.
Using Light and Dark Colors
While there are a lot of darker colors in the foreground the artist has still used contrast between light and dark to create depth.
Using Muted and Vibrant Colors
If you look closely at the large mountain in the background, you’ll notice that the colors are quite dull. As you look at the highlighted valley and even the trees on the small hillside the artist uses the bright vibrant colors of fall trees to create a contrast.
Linear Perspective Lines
While not very prevalent in this painting, you can see this in the path leading through the valley
Controlling the Amount of Detail
Similar to the observation in muted colors, it’s hard to make anything out in the hills and mountain other than shape and color. While the objects in the foreground have a high level of detail and texture.
Using Light and Shadow
The use of light and shadow in this painting is striking, and one of the reasons I was first drawn to it. It provides a clear focal point to the scene.
See if there are other perspective techniques you can pick out from this painting.
Perspective Applied to Photography
As mentioned previously, photography requires the opposite process of translation. We start with a 3D space and have to transfer it to a 2D space without losing the feeling of depth.
So photography, in contrast to painting, is about preserving perspective and depth, rather than having to create it.
A lens in and of itself doesn’t have a perspective, other than something like a fisheye lens. The lens just captures the information before it. Focal length isn’t the cause of a change in perspective, although that is a common thought out there. Some lenses will have distortion, which is related to the focal length, or better said, as a result of the viewing angle.
However, a perspective difference, as we will discuss, is the result of distance from the subject rather than the lens.
Let’s review what viewing angle is.
Angle of View – Amount of a scene that is captured. This is measured in degrees and is directly related to the combination of focal length and sensor size.
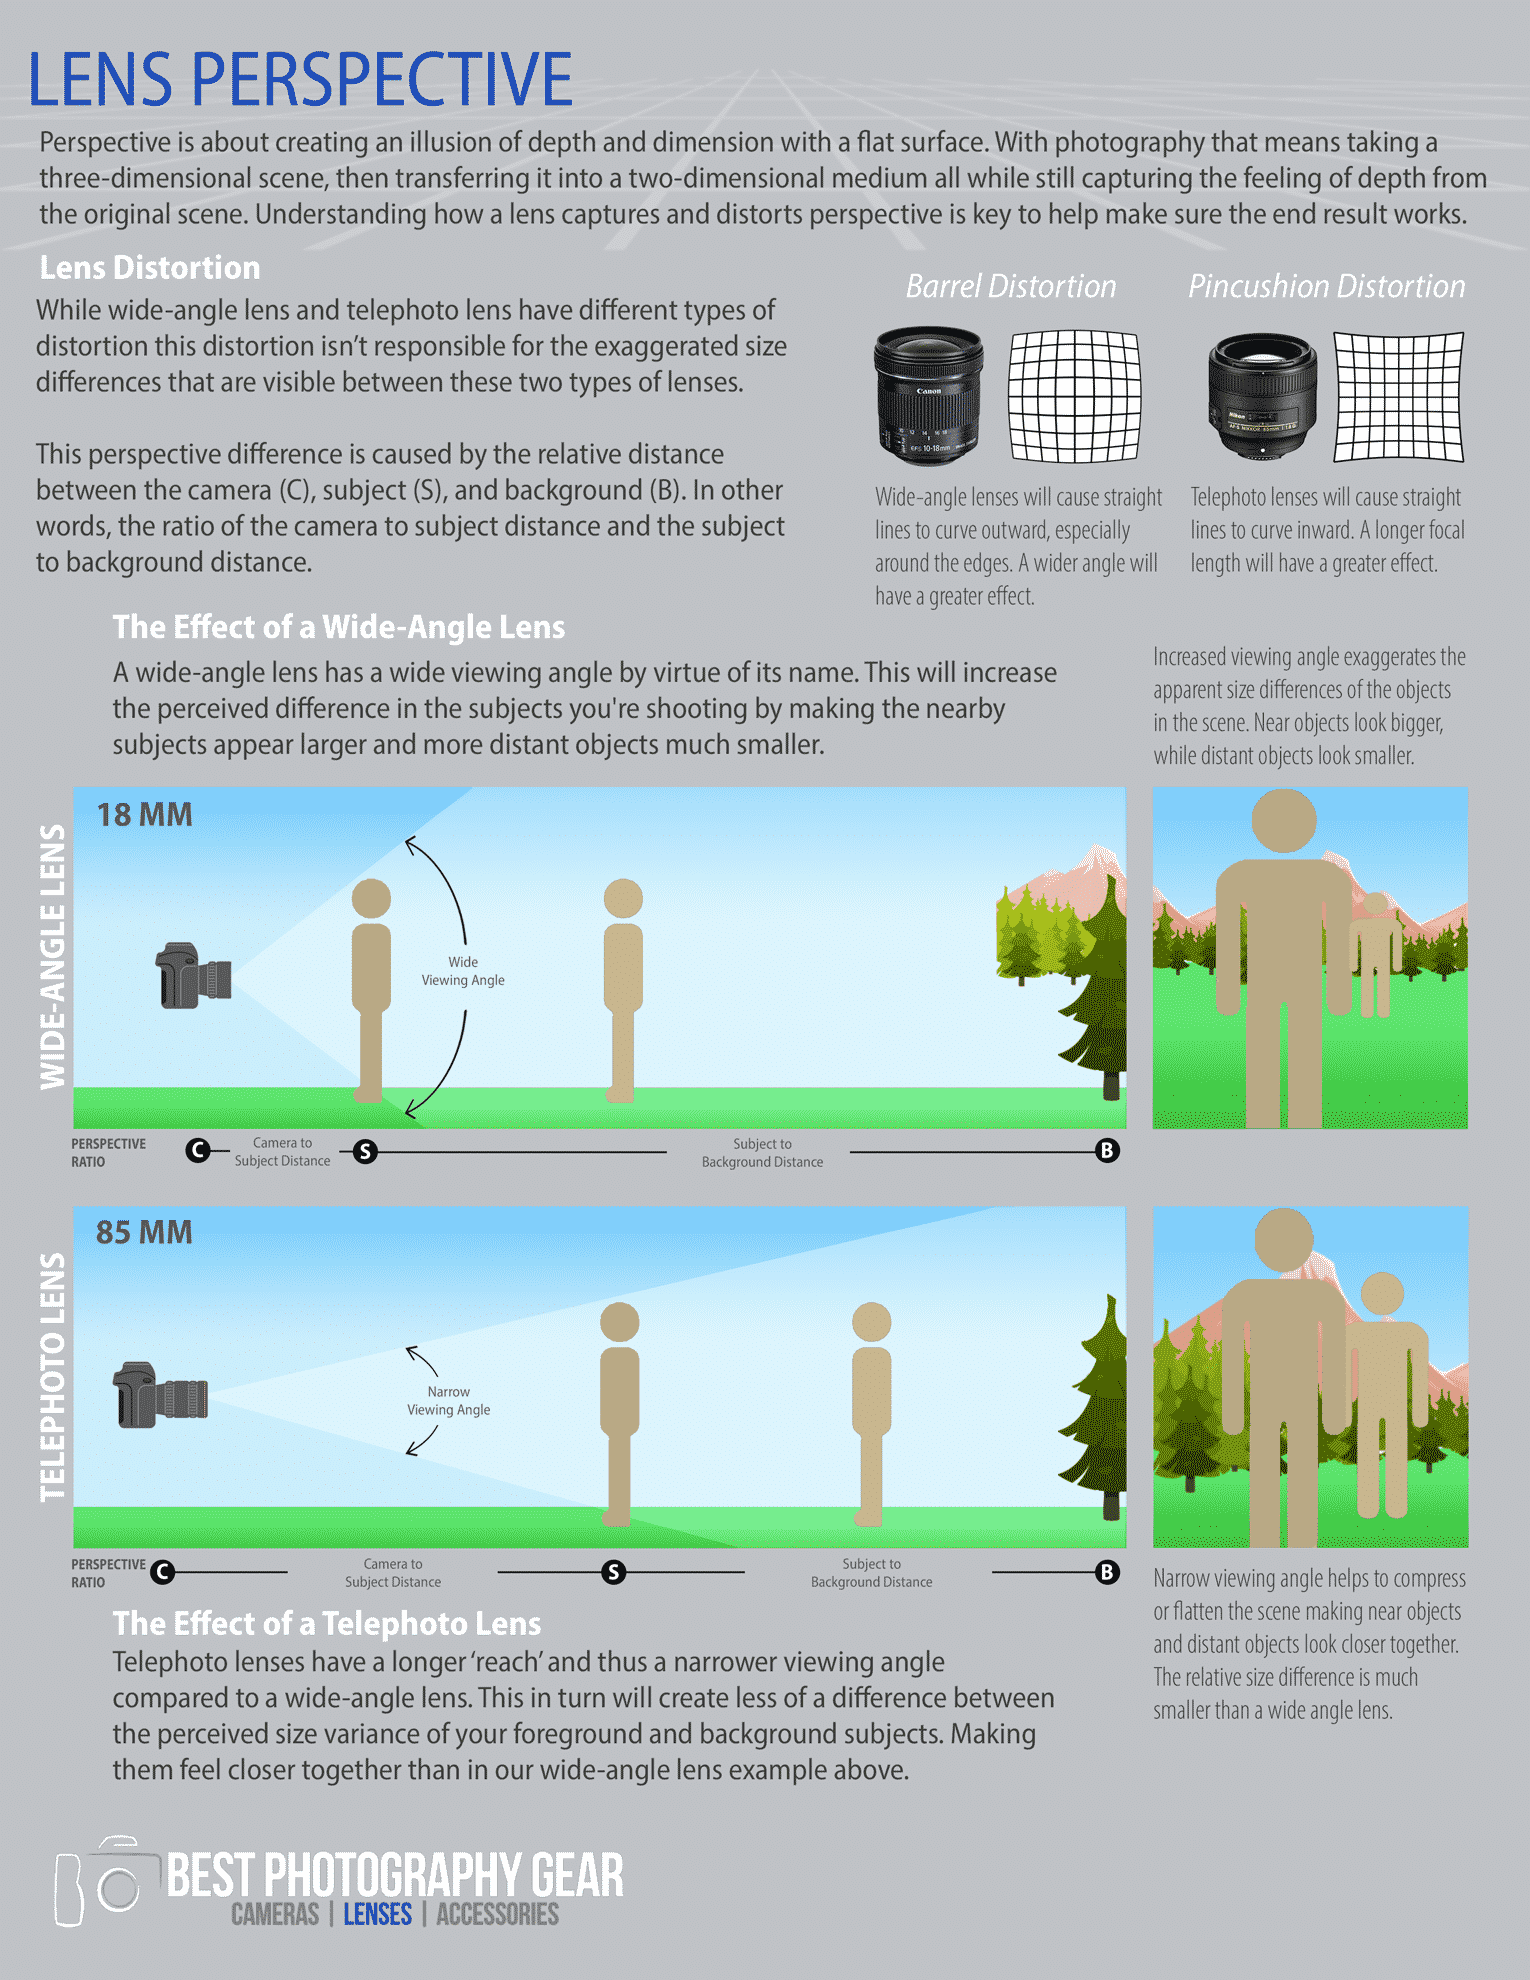
As we’ll discuss further, increased viewing angle (think of a wide-angle lens) exaggerates the apparent size differences of the objects in the scene. Near objects look bigger, while distant objects look smaller.
Narrow viewing angles (think telephoto lenses) helps to compress or flatten the scene making near objects and distant objects look closer together. The relative size difference is much smaller than a wide-angle lens.
The Real Cause of Perspective Differences in Lenses
As can easily be observed in real life or with a camera, an object that is closer to the camera lens or eye appears much larger than if it is farther away.
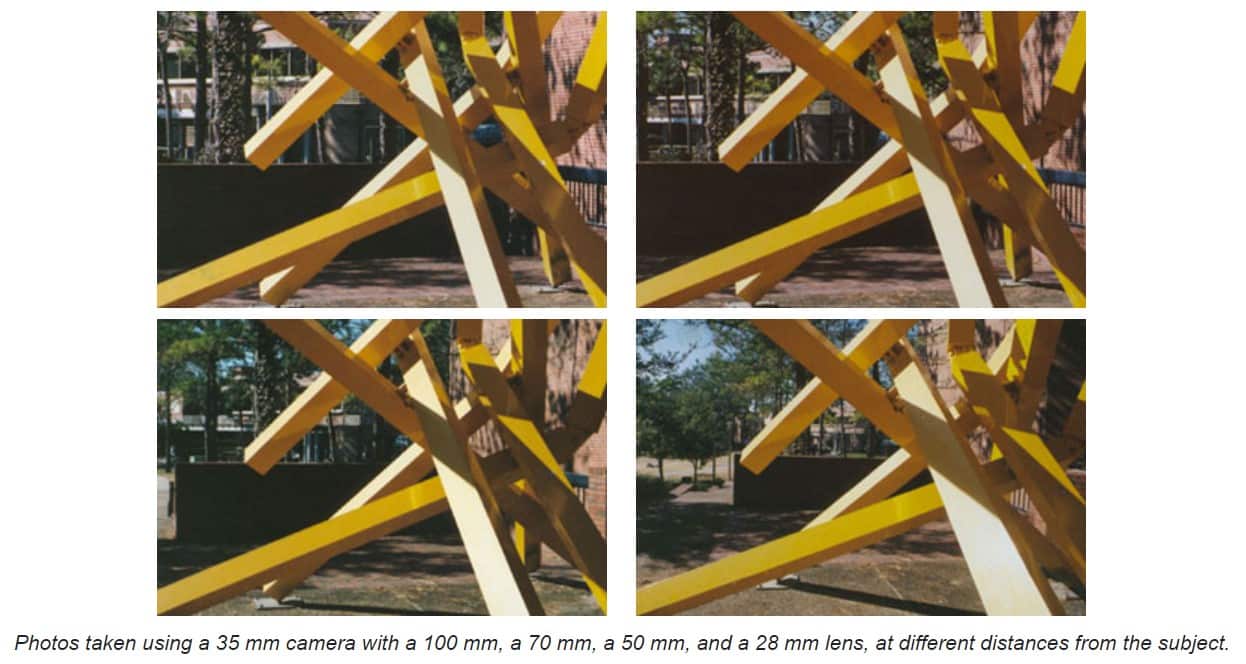
When we talk about perspective difference, we are referring to something that has nothing to do with the lens. For example, where the objects in a scene are sized differently based on the type of lens you use.
This image from Wikipedia is a great example of this. As you look closely at the background you can see that the relative size of the objects is changing, while the foreground remains fairly constant.
At first it may be assumed that this is due to something in the lens or the focal length, but that is not the case.
While wide-angle lens and telephoto lens have different types of distortion this distortion isn’t responsible for the exaggerated size differences that are visible between these two types of lenses.
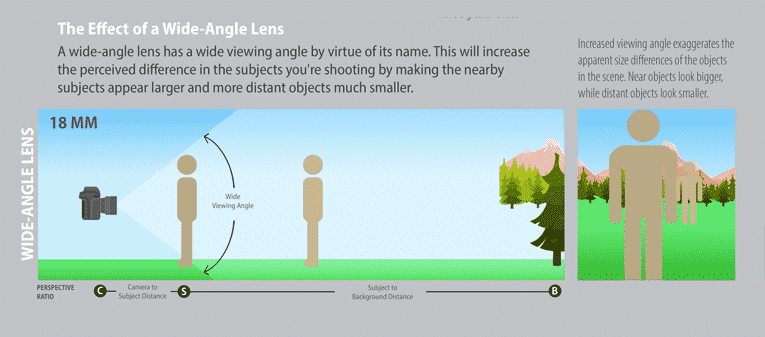
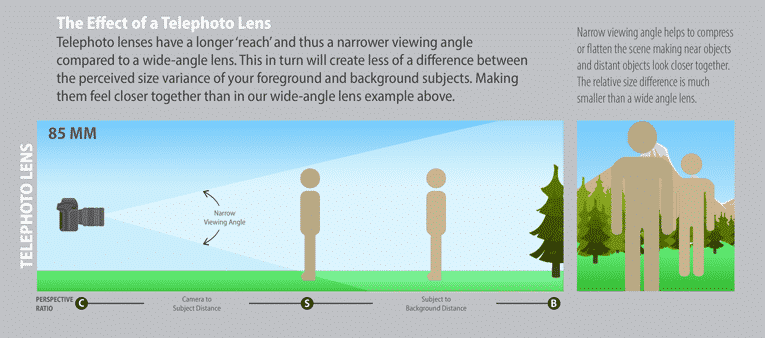
This perspective difference is caused by the relative distance between the camera (C), subject (S), and background (B). In other words, the ratio between the camera to subject distance and the ratio of subject to background distance.
View the example images below and feel free to save or share the free printable.
The Effect of a Wide-Angle Lens
With a wide-angle lens (aka: wider angle of view) you have to get closer to your subject for it to ‘fill your frame’. This means your camera is closer to the main subject, so the ratio between the C-S and the S-B distance is smaller.
A wide-angle lens has a wide viewing angle by virtue of its name. This will increase the perceived difference in the subjects you’re shooting by making the nearby subjects appear larger and more distant objects much smaller.
Here are some of the common applications for a wide-angle lens.
- Elongate space
- Exaggerate distance
- Make the subject or person feel like a small part of the larger environment
- Stretch perspective
- Deep depth of field
- Feeling of a large space
- Distort a close-up portrait
The Effect of a Telephoto Lens
Telephoto lenses have a longer ‘reach’ and thus a narrower viewing angle compared to a wide-angle lens. This in turn will create less of a difference between the perceived size difference of your foreground and background subjects, making them feel closer together than a wider lens.
The illustrations are meant to show that the ratio of C-S and S-B are different with wide-angle and telephoto lenses. Since the viewing angle is different, if you want the subject to fill the same amount of the frame you are forced to move the camera to a different distance, thus changing the ratio or relationship of those distances.
Here are some common applications for a telephoto lens.
- Compress distance
- Squash space
- Make the subject or person feel closer to the surrounding environment
- Brings subject closer to the camera
- Shallower depth of field
So What Does this Mean?
When you are layering your composition with a closer subject over your background objects, you can change the feel of the image with your lens choice.
Even with the same physical distance between the subject and the background you can either make them feel closer together by using a telephoto lens or further apart by using a wide-angle lens.
Again, this is not because you are changing lenses, but because you are forced to move the camera closer or farther from the subject, which changes the perspective ratio distance.
Once this is understood you can confidently choose a lens based on how it will represent the space. Enabling you to tell a better story with your images.
Free Printable - Lens Perspective
You are Welcome to Save and Share.
Concluding Thoughts
Understanding perspective will equip you with the tools you need to preserve the illusion of depth and dimension in your photos. As you use a more critical eye to search for perspective clues before you snap a photo your final images will capture the beauty of the original scene.
Then by knowing the effects that different lenses will have on the perceived perception you can control the feeling and story that you are trying to tell.
Related Articles
The Most Creative and Unique Gifts for Photographers
One characteristic that is almost universal with any photographer is that they are creative. If you don’t think of yourself...
Read MoreWhat Gift Do You Buy For a Photographer?
Before you buy a gift for a photographer you need to know this one thing; they are extremely picky! That’s...
Read MoreThe Best Place to Rent a Camera Lens
Searching for "camera lens rentals near me"? How can you be sure you're getting the best price and options from...
Read MoreFirst and foremost, I’m a husband and father. Then professionally I’m photographer, designer, blogger, and Esty store owner. My homebase is near the stunning Wasatch mountains in Utah but I love traveling with my family as part of our homeschooling journey. I also love teaching and helping out others. My faith is one of the biggest aspects of my life and brings be a consistent joy that I haven’t found in anything else. My main blog is BestPhotographyGear.com and I strive to make photography simple for anyone looking to learn or find gear for their individual needs. By nature, I like to study, research, and analyze things and I use that help provide the best advice and reviews I can.

